Sandwiched between Halloween and Christmas, Thanksgiving frequently gets overlooked when it comes to inventive, hands-on activities.
Certainly, there are the classic handprint turkeys your child will bring home from school year after year, but we can raise the bar a little.
After all, little ones need an entertaining, constructive activity to occupy them while you’re tied up with dinner preparations. These four Thanksgiving projects use affordable materials you likely already have at home.
1. Mini Salt Dough Cornucopia

The cornucopia — or “horn of plenty” — is a classic Thanksgiving emblem. Typically filled with harvest fruits and veggies, this mini version can be lined with a bit of wax paper and stuffed with M&Ms or candy corn instead.
What you’ll need:
- One cup flour
- ¼ cup salt
- ½ cup warm water
- Foil
- Brown acrylic paint
- Paint brush
How to create this craft:
- Preheat your oven to 325 degrees Fahrenheit.
- Shape a piece of foil into a firm cone about 4 inches tall and around 2½ inches across. Set it aside.
- Mix the flour and salt, then add the water slowly, kneading until you form a dough. If it’s sticky, add more flour; if too dry, add a touch more water.
- On a floured surface, roll the dough into a circle roughly ¼ inch thick and about 8 inches in diameter.
- Drape the flattened dough over the foil cone (pointed end up). Mold the dough around the cone and trim away excess. Use a pinch of the extra dough to form a curled hook at the tip.
- Place on a baking sheet and bake for about an hour, until the dough is dry and firm.
- After it cools, remove the foil from the center, paint the cornucopia, and let it dry.
2. Tissue Paper Harvest Corn

Corn was likely part of the menu at the first Thanksgiving. This easy project is simple to assemble and fun for kids.
What you’ll need:
- Brown construction paper
- Yellow, orange and red tissue paper
- Scissors
- Glue
How to create this craft:
- Cut one large oval and two medium ovals from the brown construction paper.
- Glue the medium ovals to the lower part of the large oval at diagonal angles to suggest husks peeling back from an ear of corn.
- Crumple small bits of tissue paper to form kernels. The amount depends on the size of your large oval; place them loosely first to check coverage.
- Once you have enough crumpled pieces, glue them onto the large oval to build your harvest corn. Allow it to dry.
3. Sponge-Painted “THANKFUL” Sign

Thanksgiving is about gratitude. Express it with a splash of autumn hues.
You can personalize this project with other words like “thanks,” “Thanksgiving” or “love.”
What you’ll need:
- White or light-colored construction paper
- Paint in fall shades
- Colored pencil
- Sponge
- Scissors
- Tape
How to create this craft:
- Write the word “THANKFUL” in large block letters on a sheet of construction paper, all caps — the larger, the better. Use stencils if you prefer.
- Carefully cut out the interior of each letter to make a full-word stencil.
- Tape the stencil onto another piece of construction paper.
- Trim a small sponge, dip it in an autumn paint color, and dab over the stencil.
- Repeat with different fall hues until the stencil area is nicely filled with paint.
- Let it dry, then remove the stencil.
- If you want, trace the letters with a colored pencil to sharpen the wording.
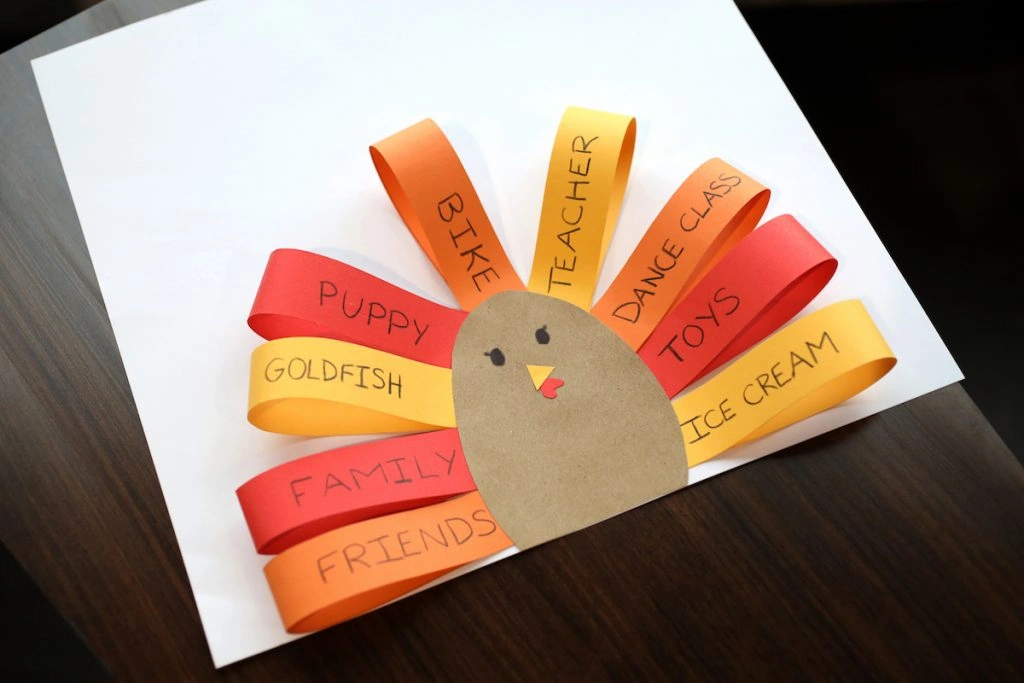
4. Thankful Turkey

Okay, we promised to move away from the typical turkey craft, but this is a refreshed version. It’s also a great way for kids to share what they’re grateful for this year.
What you’ll need:
- Construction paper in brown, yellow, orange and red
- Scissors
- Glue
- Black marker or colored pencil
How to create this craft:
- Cut a brown oval about 5 inches long and 3 inches wide for the turkey’s body. Make a small horizontal cut at the bottom to create a flat base.
- Cut a yellow triangle for the beak and a red heart (turned upside down) for the snood — that dangling bit by the beak (it’s called a snood).
- Glue the beak and snood onto the brown body and draw two eyes. Affix the turkey body near the bottom of a white sheet of construction paper, leaving the edges of the body untaped for now.
- Cut nine strips (three each of yellow, orange and red) about 1 inch wide and 8 inches long for the feathers.
- Have kids write one thing they’re thankful for on each strip, writing on only half the strip and alternating writing directions (edge to center, then center to edge).
- Glue the ends of each strip together without folding to form the feather loops, making sure the words face outward.
- Tuck the feather loops into the edges of the turkey body so the messages are visible, then glue the turkey edges down as you add each feather.
Wishing you a joyful Thanksgiving!
Samantha Reed is a staff writer at Savinly. She enjoys covering family-friendly activities and household tips. She’s working on perfecting her DIY mom skills — it’s a process.