Clothes often choose the worst possible moment to give out. Who hasn’t folded into a yoga pose only to hear the dreadful tear of your leggings? Or rushed into an interview and discovered a once-pristine dress shirt is missing a button?
While you can’t always predict when a wardrobe malfunction will occur, you can get your garments back into great shape. Some alterations, like bridal gown tailoring, are better left to specialists, but many straightforward fixes are doable at home. Learning these skills can significantly lengthen the lifespan of your wardrobe and reduce the cost of replacing or paying for professional repairs.
Want to restore your damaged pieces to their former glory? Here are practical repair skills to pick up.
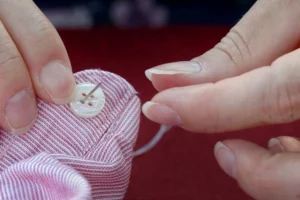
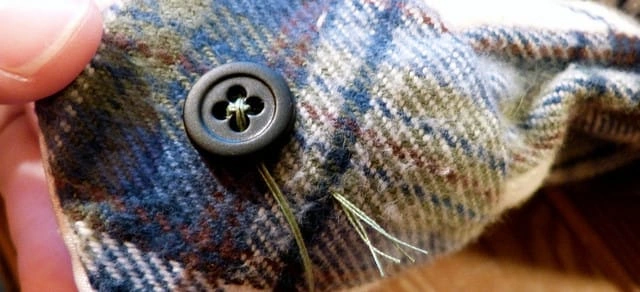
1. Sew on a Button
Inspect your buttons each time you launder clothing — it’s an ideal moment to spot any that are loosening. If you catch one starting to hang by a thread, mend it before it comes off entirely. Reattaching a button is much simpler than hunting for a replacement later.
If the original button is already gone, check the garment for a spare. Many shirts and trousers stash extra buttons inside a cuff, waistband or along the placket (the folded fabric strip where buttons and holes meet). If no spare is available, take the item to a craft or fabric store to find a close match.
You’ll also need thread that matches the fabric and a sewing needle. With materials ready, follow these easy steps to secure your button.
2. Repair Torn Seams
When the crotch of your pants splits (or another seam gives way), follow these instructions from a seasoned tailor to make those seams look like new. This method is somewhat challenging, so consider watching the video a few times before you begin.
You’ll need matching thread, a needle, scissors and a thimble (useful when working with heavy fabrics like denim). Turn the garment inside out to find the tear. Then prepare your needle and thread by cutting a suitable length, knotting one end and threading the needle.
Use a running stitch to bring the seam edges together. Follow that with an overcast or backstitch to reinforce the seam and prevent fraying. Finish by tying off securely and trimming excess thread. The video clearly demonstrates each stitch; after viewing it, even a beginner should be able to mend a torn seam.
3. Replace a Drawstring
If the drawstring slips out of your favorite hoodie or sweatpants, use these straightforward instructions to thread it back without hassle. This approach works best when the drawstring has come entirely free; if one end is stuck inside the casing, it’s easiest to remove the whole string first and then reinsert it.
Begin with a safety pin. Fasten the pin to one end of the drawstring and feed it into the channel where the cord runs. Gently push the safety pin through the waistband (or hoodie opening), maneuvering it toward the opposite eyelet. Once the string emerges, remove the pin. Tie larger knots at each end to reduce the chance of it slipping back inside.
4. Sew a Hem
Knowing how to hem is a handy, basic skill that helps shorten garments that are too long and finish raw edges on items like table linens and curtains.
Follow this tutorial to learn hand-sewing and machine hemming techniques. The instructor covers hem components (edge types, the hemline and seam allowance) and demonstrates how to create a blind hem (very commonly used) with stitches such as the catch stitch or slip stitch. These terms may seem unfamiliar at first, but with a little practice anyone can sew a neat hem. It might take a few tries to get it right, but the skill is well worth it.
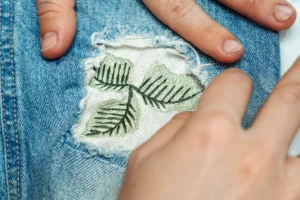
5. Patch a Hole
To patch a hole you’ll want fabric scissors, thread that matches the patch, a needle, a ruler, pins, an iron and suitable patch fabric. Choose patch material that’s as durable as the original fabric.
Measure carefully before cutting the patch. Learn how to size the patch correctly, press its edges, pin it into place over the hole and master the somewhat tricky task of stitching a patch onto a pant knee without sewing the two legs together by mistake. This video supplies full guidance. While moderately difficult, this method is achievable for most people.
6. Darn a Sock
When holes start appearing in your socks, you don’t have to endure cold toes or toss them out right away. Darning isn’t merely an old-fashioned term — it’s an effective way to restore socks.
This methodcalls for a darning needle (long with a large eye and a blunt tip), embroidery thread and a “darning mushroom” (or a rounded object to stretch the sock over — a tennis ball works). Turn the sock inside out and stretch it over the mushroom. Avoid knotting the thread to prevent an uncomfortable lump. The clip provides a clear demonstration of how to stitch the holes closed.
It’s a fairly advanced repair, so practice on a worn-out pair before tackling your favorite socks to build confidence and skill.
7. Troubleshoot Zippers
Zippers can present several issues, including sliders that veer to one side of the track — a common but fixable problem. When a backpack or purse zipper derails and the teeth separate, leaving only the slider holding things together, it’s aggravating but often repairable.
If basic fixes don’t resolve the issue, you may need to install a new zipper. Replacing a zipper is a bit more involved than sewing on a button or hemming, but it’s still within reach for a confident amateur sewer.
A small amount of handiwork can save you a significant amount by prolonging the life of your clothes. This skill is especially useful when you find slightly flawed garments at steep discounts — whether thrifting, shopping big-box clearance or browsing local shops. Fix them up and enjoy the savings, or even resell the items online after you restore them.